As we painted the walls we decided to get a bit creative and paint a grove of birches all along one wall. It came out really sweet--so soft and pretty. We did the entire project including painting the walls and ceiling in one weekend.
BIRCH WALL TUTORIAL
materials:
- 2 colors of wall paint (we used latex eggshell) one color of the base wall color and a lighter shade for the birches. Choose a color a few shades lighter than your wall color for a subtle effect or white. We ended up just using white ceiling paint.
- 1-2 rolls blue painters tape--1 inch rolls (wider will also work).
- mini paint roller and brush
- small paint brushes for trim work--1-inch or so
- utility blade
- cutting matt
directions:
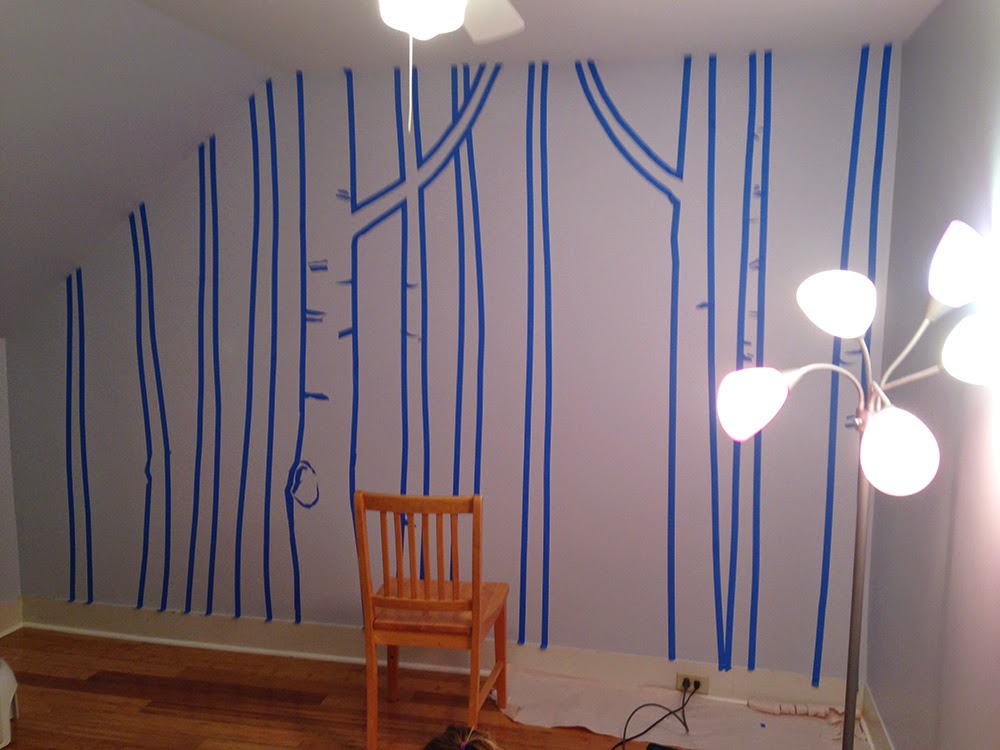
Paint your walls a base color of your choosing. We used a soft blue-gray color Behr "misty surf" and let it dry. Once the walls are dry you can begin taping the birches. I started with the largest tree running the tape from the bottom of the wall all the way up to the ceiling. I didn't worry about making the trees perfectly straight but let them curve slightly. Make sure that the trees are wider at the bottom and narrower at the top. On the largest tree, I added a knot, rounding the tape slightly into a bulge in the tree trunk. I also added a branch on the largest one.
I then added the remaining trees around the large one--varying the widths on all. Some trees overlapped the large tree branch. In this case, using the utility knife carefully cut away the tape in front of the branches.
Now, you are ready to add the bark rings on all of the trees. Tear off long strips of tape and lay them on the cutting matt; now using the utility knife cut the tape into curving rings in various lengths. You can also tear the tape with your fingers. Notice that the bark rings all curve in the same direction. Have some rings come off the right side and some off the left. Try not to make the rings too regularly spaced. Add the knots in in a circular pattern.
Stand back and view the birches from a distance making sure each tree looks visually pleasing. When you are satisfied go over all the tape with your fingers--pressing down to made sure the tape is firmly sealed to the wall.
Now you are ready to start painting! Using the mini roller and either the white or color of your choosing carefully paint in the trees. If you go over the outside edge of the tape--wipe it off right away or you can do touch-ups after you are done. Use a small brush to paint up to the bottom and top edges of the wall.
Let it dry and repeat with at least one or two more coats.
This is what it will look like after you have painted all the trees white.
Wait for the paint to dry before removing the tape. This is the tricky part! You have to carefully remove the tape so that you don't rip up the under painting. Even so, some will likely come up here and there and you can touch that up with at the end with a small paint brush. Starting at the top, gently pull the tape off at a 45 degree angle. Go slow! This is a bit tedious but take your time with this part. You will have to pick out the smaller pieces of tape with your finger nail or the tip of a utility blade to get them started at the corner.
Finished wall.
Happy daughter. :-)


3 comments:
Painting services in dubai
Very niice blog you have here
This birch wall idea is so creative, I love how soft and pretty it looks.
Post a Comment