Monday, September 8, 2014

TUTORIAL: how to paint a birch wall

I spent this past weekend doing a room makeover with my daughter. She wanted a change from the last time we updated her room in fifth grade--she is now a junior in high school so this will probably be the last one before she goes off to college.

As we painted the walls we decided to get a bit creative and paint a grove of birches all along one wall. It came out really sweet--so soft and pretty. We did the entire project including painting the walls and ceiling in one weekend.

BIRCH WALL TUTORIAL

materials:
  • 2 colors of wall paint (we used latex eggshell) one color of the base wall color and a lighter shade for the birches. Choose a color a few shades lighter than your wall color for a subtle effect or white. We ended up just using white ceiling paint.
  • 1-2 rolls blue painters tape--1 inch rolls (wider will also work).
  • mini paint roller and brush
  • small paint brushes for trim work--1-inch or so
  • utility blade
  • cutting matt

directions:

Paint your walls a base color of your choosing. We used a soft blue-gray color Behr "misty surf" and let it dry.  Once the walls are dry you can begin taping the birches.  I started with the largest tree running the tape from the bottom of the wall all the way up to the ceiling.  I didn't worry about making the trees perfectly straight but let them curve slightly. Make sure that the trees are wider at the bottom and narrower at the top. On the largest tree, I added a knot, rounding the tape slightly into a bulge in the tree trunk. I also added a branch on the largest one.

I then added the remaining trees around the large one--varying the widths on all. Some trees overlapped the large tree branch. In this case, using the utility knife carefully cut away the tape in front of the branches.


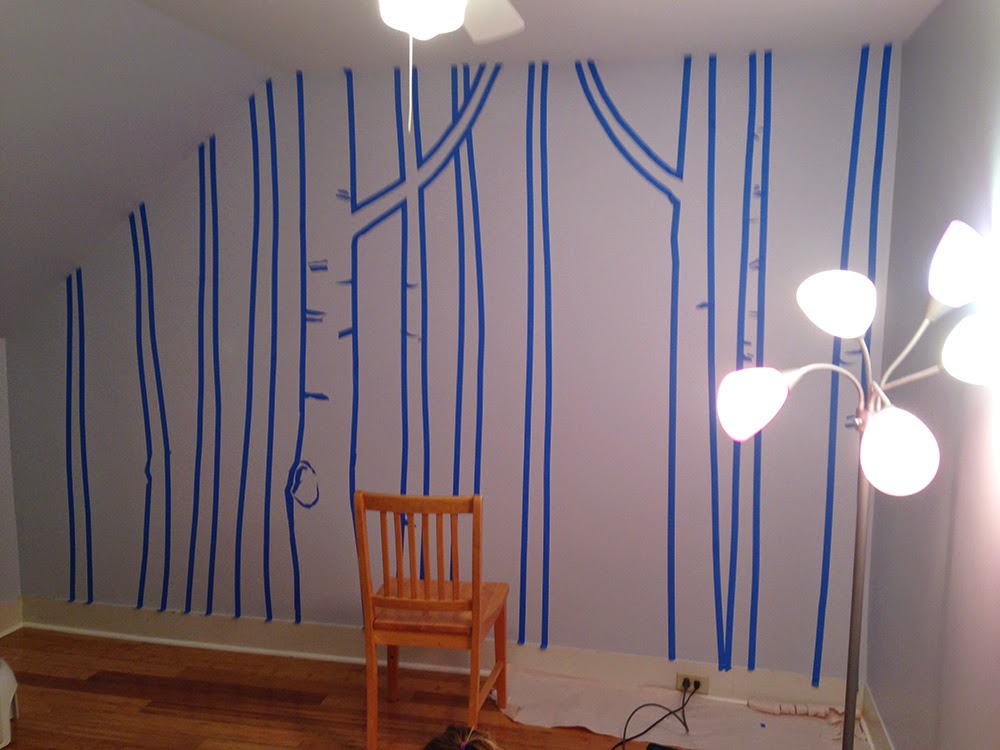
Now, you are ready to add the bark rings on all of the trees.  Tear off long strips of tape and lay them on the cutting matt; now using the utility knife cut the tape into curving rings in various lengths. You can also tear the tape with your fingers. Notice that the bark rings all curve in the same direction.  Have some rings come off the right side and some off the left. Try not to make the rings too regularly spaced. Add the knots in in a circular pattern.

Stand back and view the birches from a distance making sure each tree looks visually pleasing. When you are satisfied go over all the tape with your fingers--pressing down to made sure the tape is firmly sealed to the wall.


Now you are ready to start painting! Using the mini roller and either the white or color of your choosing carefully paint in the trees. If you go over the outside edge of the tape--wipe it off right away or you can do touch-ups after you are done. Use a small brush to paint up to the bottom and top edges of the wall.

Let it dry and repeat with at least one or two more coats.


This is what it will look like after you have painted all the trees white.


Wait for the paint to dry before removing the tape.  This is the tricky part! You have to carefully remove the tape so that you don't rip up the under painting. Even so, some will likely come up here and there and you can touch that up with at the end with a small paint brush. Starting at the top, gently pull the tape off at a 45 degree angle. Go slow!  This is a bit tedious but take your time with this part. You will have to pick out the smaller pieces of tape with your finger nail or the tip of a utility blade to get them started at the corner.


Finished wall.


Happy daughter. :-)

Wednesday, June 11, 2014

LEARNING TO SEE: guest post by Luann Udell


Guest post by Luann Udell. 
Luann writes for FineArtViews and The Crafts Report magazine.  She's a double-juried member of the prestigious League of New Hampshire Craftsmen (fiber & art jewelry).  Her work has appeared in books, magazines and newspapers across the country and she is a published writer.  She's blogged since 2002 about the business side--and the spiritual inside--of art.  She says, "I share my experiences so you won't have to make ALL the same mistakes I did...."

LEARNING TO SEE: An Art-Making Class with Kristina Wentzell


Last night I sat down to an easel for the first time in 45 years.

And I created a painting that I LIKED for the first time in my life!

How did I get here?? It’s a miracle!

I was part of Kristina Wentzell’s painting party at the “Art, Wine & Fun Night at Walpole Mountain View Winery” in Walpole, NH.  (You can see more of Kristina’s themed painting parties here.)

Kristina started these painting workshops awhile back. Known for her own vibrantly colored, cheerful landscapes and still lifes, she works with groups to introduce them to the pleasures of painting. 

Kristina showed us how to recreate one of her original paintings—in this class, a view of a vineyard. (The best part of this class? You could look out the window in the sunroom/tasting room where we worked, and see similar mountains and vineyards!)


Our workspace at the Walpole Mountain View Vineyard. As lovely as Kristina's painting!

She broke it down into a step-by-step process, guiding us all the way.  When we were ready to get to work, we sat ourselves in the sunporch/tasting room,  with gorgeous views of the vineyards on three sides.  Easels were already set up and ready to go with a primed canvas, along with brushes (two), paint palettes (a paper plate with the eight colors we’d need) and a waterproof tablecloth (which was useful almost immediately!)


Here's where it all starts. Orange!


Kristina showed a finished sample of her painting—the one we would recreate-- along with versions of each step. As she explained each technique, she demonstrated on each appropriate sample painting.

We started with a light charcoal sketch, which allowed us to play with our compositions until we got one we liked.  Then we mixed our first wash of color and painted over our sketched lines. We continued to mix the colors Kristina introduced, adding layer after layer of hues, moving into different areas of the canvas. 

​I do like my mountains!


As we worked, Kristina came by with encouragement and suggestions. When I got stuck, she was right there, guiding me gently along. When I ran out of green (about three times!), her assistant Kat, a Keene State College art student, was right there with the paint tube.


​Kristina worked with everyone, to make sure no one felt left behind!​


The hardest part? I was surprised by what I thought would be the easiest step—mixing colors.   Kristina showed us how to work the pigments together, creating a little “mound” of color. It’s actually harder than I thought to mix pigments into such a small, neat “pile”.  I tend to mush it all over, which not only takes up a lot of “real estate” on my plate, as Kristina put it, but also makes the paint dry faster.  I believe I’m the only person who had to ask for an extra plate.  The result was, I had to constantly stop to mix more color, which meant a subtly-different color mix each time. Hmmmmm…..I’m gonna have to practice that!


Still need to master the "little mound" method of mixing paint. I used up all my "real estate" on the plate, as Kristina put it.


​I was graciously given a second plate.  ​
 

The second hardest part? Like any work of creativity, what we make doesn’t look like much until we’re completely finished.  It’s important to keep that in mind at all times.  It takes patience and confidence to accept each step as “what it is”, moving on to the next step, and the next. Until finally, we’re ready to tweak here and there….and voila! A miracle—a change in perpective.  Instead of cartoonish drawings and blobs of color, a lovely landscape emerges. And there is our finished painting. I carefully signed “LU” to the bottom corner, not trusting my skill at painting my whole name.

The beauty of this process is that I never felt I’d “screwed up”—at least, not irreparably so.  Sometimes I made course corrections. Other times I shrugged and said, “No, it doesn’t look exactly like Kristina’s.”


I do like my trees!​


Because it shouldn’t look exactly like Kristina’s!  As each person bravely held up her piece, (and the admiring “ooohs” and “ahhhhs” started) it was so obvious to all of us….

We had all painted “the same thing” in a style that was uniquely ours.

All of our color choices were similar—but also very different.  Some of us had limned gently rolling hills. Others had mountains that seemed to dance.  Some of us had painted a soft sky, while others had skies that rolled and glowed. 

We had all created a version of Kristina’s painting. And we had all created something very different and unique.


My grapevines looked a little like lettuce, so I went rogue and added some squiggly details to them. They still look like lettuce. But like artistic lettuce.


I’ve learned the power of good framing. Tomorrow I’ll mosey on down to Creative Encounters in downtown Keene. I know Karen Lyle and her staff will help me choose the perfect frame for this piece, at a price that’s affordable for me.  It will join the other works in my collection of new and vintage landscapes, painted by talented professionals and eager neophytes. (Of which I’m firmly the latter.)

I had a wonderful evening out with delightful people. I sipped local wines, munched on incredibly delicious cheese and met up with old friends.  I now own an original painting by Luann Udell for the price of a few good bottles of wine.

And I came home with an incredible sense of accomplishment and joy.  I have lost my own fear of painting.  I’m not giving up my day job to become a painter. But I now see the attraction of the process. And I’m delighted with my modest results.

Thank you, Kristina!

.

Tuesday, June 3, 2014

Kristina Wentzell featured in Studios Magazine: Summer 2014


Kristina Wentzell is in the current edition of Studios Magazine (Summer 2014) that is on news stands now. Take a look inside for a special feature on what inspires Kristina. 

Folks in the Keene area can pick up a copy locally at Creative Encounters at 18 Main Street, Keene NH. 


Tuesday, May 6, 2014

Fiddleheadin'

reposted from 5/12/2012 

what to do in mud season:


Early May in Rangeley, Maine is mud season.

The north country doesn’t really have spring like the rest of us…the long, cold winter up there sort of just segues into a season of fog, chilly raw days, and mud. Lots of mud.  It’s a bit early for fishing, much too cold to swim, all the locals get out of town to Florida for the month, and every restaurant in town closes down.

It’s real quiet.

On the drive in to town, in the last 50 miles or so we passed not one car on the state highway.

However, we did see 4 moose.

So, when my family went to Rangeley this week for a few days, our entertainment options were a bit limited.  There is one thing to do this time of year that is an annual rite of passage. 

Fiddleheading.


Fiddleheads are the curled fronds of a just emerging fern, harvested as a vegetable.  Nearly everyone in town has their secret fiddleheadin’ spot.  They tend to grow in wet areas along the rivers.

My grandfather took me fiddleheading when I was younger. He was a quintessential old Maine guide, tough and woods savvy.  He always knew of a good spot to find ‘em.  He picked fiddleheads by the gallon and stored them for the year.  He would eat them boiled, steamed, canned, fried, in pancakes and even pickled.  Some studies show that fiddleheads eaten in large quantities can be toxic but he lived to be 99 years old--so much for that theory.


So, this week we went off to that same spot by the Dead River my grandfather took me to go fiddleheading. It was still a bit early and the fiddleheads were on the small side.  We were only able to scrounge a few.  My two little charges were skeptical, or shall we say, not as familiar with the delights of fiddleheads.  But that’s okay, they’ll get there...fiddleheads are a learned appreciation.

For those of you on my mailing list, you might have noticed the delicate, curled fronds on the back of every postcard.  Now you know the story.

Tuesday, April 29, 2014

New tutorials and new Art, Wine & Fun Nights!

Spring 2014 Schedule for Art, Wine & Fun Nights


Art, Wine & Fun Nights puts the emphasis on FUN! 

Art Nights are stress-free & casual where beginners are encouraged. Kristina will guide you step by step through the process of creating your own work of art. All materials are provided and everyone will go home with a painting they can be proud of.  Beginners are encouraged!

Click here to register.

May 13th: The Marina in Brattleboro ~ Beach Day

May 15th: Kathryn's Florist & Gifts in Winchester, NH ~ tba

May 20th: Margaritas in Keene ~ summer bouquet

May 21st: Ramunto's in Keene ~ summer bouquet

May 27th: The Marina in Brattleboro ~ scarlet meadow

May 28th: Ramunto's in Keene ~ sunflowers (full!)

June 3rd: The Marina in Brattleboro ~ Paris at night

June 10th: Walpole Mountain View Winery in Walpole ~ vineyard landscape

June 11th: Ramunto's in Keene ~ birds on a wire

June 17th: The Marina in Brattleboro ~ birds on a wire

Click here to register.


Thursday, April 24, 2014

Keene Art Tour--SPRING edition!


Keene Art Tour: SPRING edition! May 3rd & 4th 2014  10am to 5pm
87 Ashuelot Street  Keene NH


The Keene Art Tour is coming soon with a new SPRING edition! Grab this map and come by car, come on foot, come on bikes, (unicycles? pogo sticks?)...we don't care. Just come! Spring will have arrived (we promise!) and the studios will be spiffed up and ready for you.

You can find me at stop #2 (87 Ashuelot Street) where I will be joined by guest artist Melinda LaBarge and her fabulous, colorful Nuno felt scarves, coats & pillows (Mother's Day gifts anyone?)

The Happy Camper Mobile Art Gallery--my 1966 DeCamp Travel Trailer converted to mobile art gallery-- will also be making her spring debut. Stop by and see what's new in my studio, the camper, meet the studio kitties and enjoy a glass of wine or two.


PS: Visitors will have a chance to enter to win two tickets to one my upcoming Art, Wine & Fun Nights. :-)